


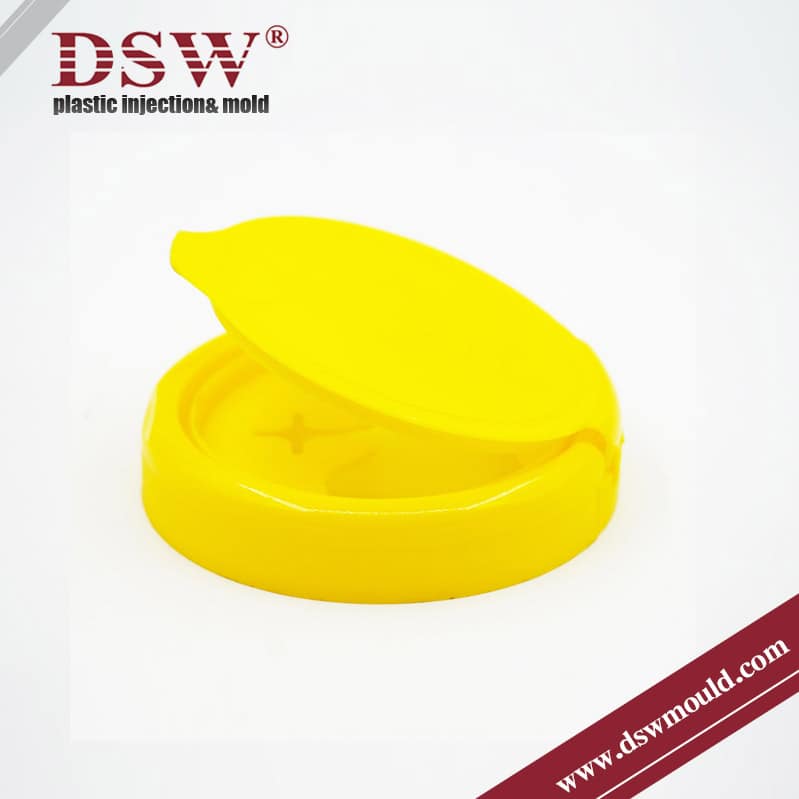
A butterfly hinge closure cap refers to a specific type of cap or lid that incorporates a butterfly hinge mechanism for opening and closing.
It typically consists of two hinged flaps or wings that can be easily lifted or rotated to open the cap, providing access to the container or object it is attached to.
When the wings are closed, they secure the cap in place, providing a tight seal.
The definition of a living hinge is a thin section of plastic that connects two large plastic pieces. In our ketchup cap example, this would be the base of the cap and the lid. The two of which are joined by a thin and flexible plastic- the hinge. In this case, the cap uses what is called a butterfly hinge.

Creating a butterfly hinge closure cap involves several steps. Here are some general tips:
1. Determine the Design: Before starting, you should have a straightforward butterfly hinge closure cap design. This includes the size, shape, and material of the cap.
2. Design Verification:
Understand the Design: Understand the cap’s design, including its size, shape, and the type of plastic used.
Measure the Cap Size: Use a vernier calliper to measure the cap size. The cap size is usually represented by two numbers: the first refers to the outside diameter of the cap (excluding threads), and the second relates to the thread height and style.
Check the Neck Finish: The neck finish includes several measurements, such as the outside diameter of the neck (including the thread), the bottleneck’s inner diameter, and the neck finish’s height. These measurements determine the compatibility between the bottle and the closure.
Verify the Thread Style: The threaded style refers to how often the threads on a container’s neck finish pass each other or turn in a non-interrupted spiral design. The thread style for the container and cap must match to establish a proper seal.
Inspect the Cap: Inspect the cap for any defects or inconsistencies. This could involve visual inspection, tactile inspection, or specialized equipment.
Test the Cap: Perform functional tests to ensure the cap works as intended. This could involve a leak test, a fit test (to ensure the cap fits the container properly), or a stress test (to see how the cap performs under pressure or impact).
3. Prepare the Materials: Gather all the necessary materials. This could include plastic for injection molding, depending on your design.
4. 3D Modeling: If you’re using software like SolidWorks, you can model the living butterfly hinge as a single part that can be opened or closed by driving the opening angle of the lid.
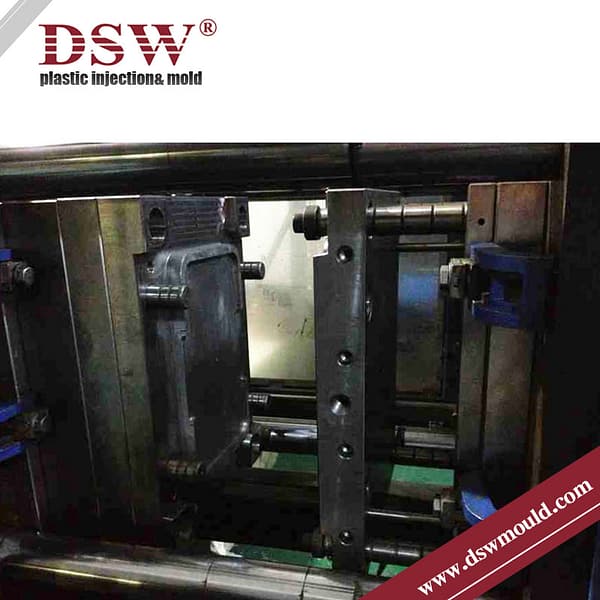
5. Mold Designing: The mold design should consider the geometry of the cap, the type of plastic to be used, and the specific requirements of the injection molding process. This includes the placement of gates, runners, and vents, as well as the design of the cooling system.
6. Simulate the Molding Process: Use mold flow analysis software to simulate the injection molding process. This can help identify potential problems such as short shots, warping, or sink marks, and allow you to optimize the mold design.
7. Fabricate the Mold: Once the mold design is finalized, it can be fabricated using CNC machining, EDM, or 3D printing techniques.
8. Test the Mold: After the mold is fabricated, it should be tested using the actual injection molding machine. This allows you to verify the quality of the molded parts and make any necessary adjustments to the mold or the molding process.
9. Manufacturing: Depending on your design and materials, this could involve processes like injection molding for plastic caps.
10. Assembling: Once the parts are manufactured, they need to be assembled. This could involve attaching the cap to the container, adjusting the hinge for proper operation, and testing the cap to ensure it works correctly.
How are plastic cups made?
Plastic cups are produced through injection molding, in which liquid-infused plastic materials are combined and inserted into an injection mold template that determines their size and thickness.
Starting the injection molding process involves placing raw material into a machine known as a “hopper,” which then mixes various plastic types and materials needed for production into one process. After mixing, materials will be poured into templates until they reach their ideal thickness and size, staying put as they cool off before slowly heating plastic cups to release their cast from their surface.


No comment