Draft Angle for Injection Molding
When developing parts for plastic injection moulding, applying a draft (or a taper angle) to the faces of the part is critical to improving the moldability of your part. Without it, parts risk poor cosmetic finishes and may bend, break, or warp due to moulding stresses caused by the plastic cooling. Equally important, an absence of draft may prevent parts from ejecting from the mold, damaging the parts and possibly the mold itself—a costly and time-consuming detour.
What is a Draft Angle in Injection Molding?
A draft is a crucial design element in injection moulds producing plastic parts. It refers to the slight taper or inclination of the mould’s walls relative to the direction in which the part is drawn or ejected from the mold. This taper is measured in degrees.
A taper angle ensures that parts can be quickly released from the mold without damaging the part or the mold itself. Parts may stick to the mold without an appropriate injection angle, leading to defects and increased wear.
Typically, engineers design moulds with a release draft of about 1.5 degrees. However, depending on the specific requirements and complexity of the part, the draft angle can range from 0.5 degrees to 10 degrees.

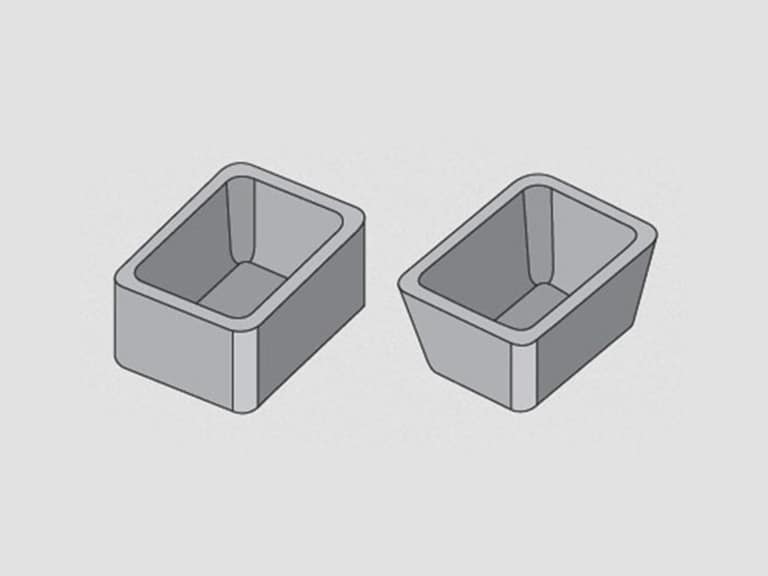
An undrafted (left) versus drafted (right) cube.
Why is Draft Angle Important in Injection Molding?
1. Ensures Easy Ejection
The primary purpose of a taper angle is to facilitate the effortless and smooth ejection of the part from the mold cavity. During molding, molten plastic is injected, cooled, and solidified within the mold. A properly applied release draft prevents a vacuum between the part and the mould’s vertical walls, which can cause sticking or require forceful ejection.
By incorporating a suitable taper angle, parts are released from the mold with minimal resistance, reducing the likelihood of defects and ensuring faster, more efficient production.
2. Reduces Cosmetic and Structural Defects
Release drafts play a critical role in minimizing cosmetic and structural defects and enhancing the quality and appearance of the moulded part. Some potential issues that can arise without a proper draft include the following:
- Scratches and Scuff Marks: Insufficient draft can cause friction between the part and the mold during ejection, resulting in visible scratches and blemishes on the part’s surface.
- Warping and Stress: Without an adequate draft, parts may experience uneven cooling and stress upon ejection, leading to warping and structural imperfections.
Incorporating the correct taper angle helps prevent these defects, ensuring a smooth, high-quality finish and better structural integrity.
3. Increases Production Efficiency
Proper injection angles contribute to shorter cycle times by enabling smooth ejection. This minimizes mold downtime and reduces the need for mold repairs due to forceful ejections. This translates into lower production costs and faster turnaround, especially in high-volume manufacturing.
Start with Drafting Early
A common mistake in the design process is overlooking draft angles when creating prototypes with 3D printing or CNC machining, where taper angles aren’t typically required. Due to 3D printing’s layer-by-layer construction, almost any design can be produced without concern for moldability. Likewise, CNC machining doesn’t involve part ejection, making slope angles irrelevant for that method.
However, if a prototype eventually goes into injection moulding, it’s wise to incorporate draft angles. Adding drafts early can impact the shape and assembly fit of a part, as well as its appearance. Designing with drafts now, even if they’re unnecessary for prototyping, can prevent costly surprises like redesigns or additional prototype development.
Plan with future needs in mind. When transitioning from 3D printing or machining to injection moulding, having drafts in place speeds up the process and allows production to begin sooner. Avoid creating a prototype that will require significant reworking later to be mold-ready.

Injection Molding Design Guide
Recommended Taper Angles by Material Type
Each plastic material has unique properties that affect slope angle selection. Below is a guideline for recommended draft angles based on commonly used plastics:
| Material | Recommended Draft |
|---|---|
| Polypropylene (PP) | 1-2 degrees |
| Polyethylene (PE) | 1-2 degrees |
| ABS | 1.5-3 degrees |
| Polycarbonate (PC) | 2-3 degrees |
These angles serve as a general guide. However, consulting with mold designers can help refine incline angles specific to your part’s needs, especially if unique material properties or complex shapes are involved.
Follow the Rules
There’s no universal slope angle for all parts, as factors like wall thickness, material type, ejection needs, shrink rates, surface finish, wall depth, and manufacturing capabilities all play a role. However, a few general guidelines can help optimize your design for injection mould.
When designing, apply as much release angle as possible. A general rule of thumb is 1 degree of draft per inch of cavity depth, which can be adjusted based on specific factors. Here are some guidelines to consider:
- Five degrees on all vertical faces is highly recommended.
- 1 to 2 degrees works well in most situations.
- Three degrees is the minimum required for shutoff areas (metal-to-metal contact).
- Three degrees is also the minimum for light textures (PM-T1).
- Five degrees or more is needed for heavy textures (PM-T2).
| FEATURE DEPTH | MINIMUM THICKNESS/DRAFT | |||
|---|---|---|---|---|
| 0.25 in. | 0.040 in./0.5° | |||
| 0.5 in. | 0.040 in./1° | 0.060 in./0.5° | ||
| 0.75 in. | 0.040 in./2° | 0.060 in./1° | 0.080 in./0.5° | |
| 1 in. | 0.060 in./2° |
0.080 in./1° |
>0.100 in./0.5° | |
| 1.5 in. |
0.080 in./2° |
>0.100 in./1° | ||
| 2 in. | >0.100 in./2° | |||
Designing for Minimal Mold Draft
In cases where the draft may affect part performance, designs can include as little as 0.5 or 0.25 degrees of the draft. Even a small draft is preferable to a zero draft. To determine the minimum possible draft, consult your manufacturer, as material type, part geometry, and production capabilities all influence draft requirements.
CNC machining is often used for low-volume aluminium tooling and core and cavity features. Since aluminium moulds require more significant draft and wall thickness than steel moulds, these adjustments can improve mold longevity without affecting part performance and enhance the quality of future production molds.

The deep-rib approach (left) and the core-cavity approach (right).
Implement a Core-Cavity Approach (Taper Angle Guidelines)
Applying drafts to enclosures requires precision. Keep the inner and outer walls parallel to avoid deep ribs that complicate venting, ejection, and mold finishing. A core-cavity approach opens up the mold cavity and core, simplifying polishing and increasing production speed, resulting in a smoother moulding process.
Take Advantage of DFM Analysis
DSW offers a free Design for Manufacturability (DFM) analysis on every 3D CAD model uploaded. Within hours, you’ll receive a quote, release draft recommendations, and suggested improvements to enhance moldability. This service acts as a valuable quality check, helping to prevent mold issues before production.

Factor in Surface Finish
How does the slope angle affect the part’s finish? But if there is no mold draft, the part will drag on the mold surface while the mold opens and ejects the parts, creating surface finish scratches. Since all thermoplastics shrink while they cool in the mold, a massive amount of surface tension is created, preventing the part from releasing cleanly during ejection. This tension creates minor scratches in the polished surface, even worse for textured surfaces if a release draft is missing.
The texture is applied in many ways, but they all create micro undercuts from pitting the mold surface. The texture on the mold walls would lock the part into place if it weren’t for our old friend, draft. By applying a degree of the draft, the part is allowed to move a short distance before the mold shrink can clear the micro undercuts, and ultimately the concern of mold drag or scratches on the part is minimized. On finishes, Protolabs requires a minimum of 3 degrees of draft for a light bead-blast finish (PM-T1) and 5 degrees of draft for a medium bead-blast finish (PM-T2).
Determining Draft Angles for Injection Molding
Understanding draft angles in injection moulding can be complex, so here’s a concise list of tips and tricks to simplify the process:
-
- Standard Recommendation: A draft angle of 1.5 degrees is recommended for general injection moulding.
- Cavity and Core: Incorporate incline angles in both the cavity and core, with a slightly larger release draft for the core.
- Depth Adjustment: Add 1 degree of draft for every inch increase in part depth.
- Surface Texture: Smooth surface textures require smaller slope angles, while rough textures need more extensive drafts. Increase the draft by 0.4 degrees for every 0.1 mm increase in surface roughness.
- Vertical Features: Apply release draft to all vertical features, including walls, ribs, louvres, and undercuts.
- Core Cavity Approach: If the outer face of the component needs to be smooth, use the core cavity approach.
- Side Drawing Features: Include drafts requiring side drawing (additional drawing direction).
- Material Considerations: Different plastics have unique shrinkage rates and flow properties, impacting draft requirements. Hard materials with abrasive qualities need a higher taper than soft, ductile materials.
- Part Geometry: More complex shapes, such as those with intricate curves or multiple details, often require larger slope angles for easy mold filling and ejection.
- Tolerance Levels: Taper angles affect final part dimensions, so planning for these angles in line with dimensional tolerances is essential.
- Collaborate with Mold Designers: Experienced mold designers can offer insights on incline angle direction, mold release, and surface impact, ensuring draft angles suit both the design and material.
Incorporate these considerations early in the design process to enhance product quality and production efficiency.
Benefits of Collaborating with Injection Molding Specialists
Working with experienced professionals like DSW can enhance injection molding draft design for optimal mold performance and product quality. DSW specialists can help with:
- Slope Angle Analysis: They assess draft requirements, factoring in material shrinkage, texture, and mold orientation.
- Injection Angle Optimization: Experts can recommend injection angles that improve part ejection and reduce cycle time.
- Texture and Mold Release Evaluation: IMS evaluates draft requirements for textured surfaces to prevent sticking or part damage.
A consultation with injection moulding specialists ensures that your draft design is accurate and reliable, helping to avoid defects and production issues. Contact Integrated Molding Solutions today to discuss your plastic product design and injection moulding needs.








No comment